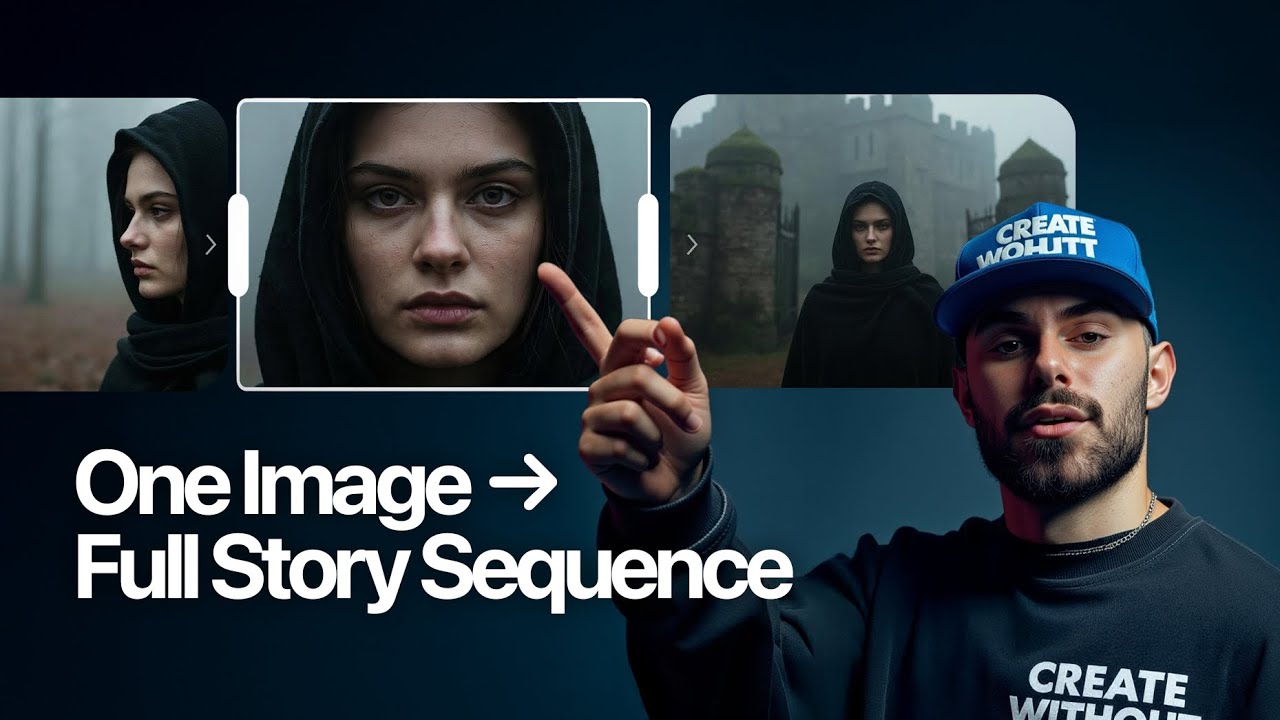
Have you ever wished you could create a full visual story using just one image? Whether you’re a filmmaker, creative director, or photographer, you’re about to discover how to generate consistent characters, backgrounds, and scenes—all powered by AI.
In this post, we’ll walk you through how to use AI tools like ImageN 4 (by Google), Enhancer.ai, and ChatGPT to build cinematic, consistent visual narratives—without needing a camera, studio, or location shoot.
Why Consistency & Continuity Matter in AI Storytelling
In traditional media, consistency is key. Films rely on script supervisors; photographers control lighting, wardrobe, and settings. But in AI-generated art? Consistency is a challenge.
AI models are designed to create new images every time. But with smart prompting and the right tools, you can train them to behave more like professional production crews—delivering frame-by-frame continuity that feels both realistic and intentional.
🎯 Pro Tip: In visual storytelling, consistency = realism = value = monetization.
Step 1: Generate Your Character & Source Image
Your journey starts with a strong character and an intentional source image. Use Google’s ImageN 4 inside Whisk AI to generate crisp, photorealistic visuals.
Key Tips for the Perfect Image:
-
Use frontal, readable expressions.
-
Ensure costume details (folds, accessories) are visible.
-
Control the background to maintain visual continuity.
📸 Example Prompt:
“A moody, photorealistic close-up of a model in a foggy forest. Background softly blurred with a faint silhouette of a castle. Cinematic lighting, natural skin texture.”
👉 Be intentional. Think about the story, the mood, the world your character inhabits. Words like “photorealistic,” “moody,” and “cinematic” help dial in precision.
Step 2: Create Variations & Consistent Frames
Now that you’ve got a strong source image, let’s build a visual sequence using context editing in Enhancer.ai.
How To:
-
Upload your image to Enhancer’s context editor.
-
Use a prompt to describe the next frame: different angle, movement, location, etc.
-
Use ChatGPT to create prompt variations (side angle, zoomed out, aerial shot, etc.).
💡 Example Prompt Variation:
“A photorealistic portrait of a model standing in a foggy forest shot from a medium distance.”
🎬 Think like a cinematographer. Use terms like:
-
“Establishing shot”
-
“Over-the-shoulder”
-
“Tracking shot”
-
“Cinematic lighting”
Step 3: Add Props & Creative Control
Want your character to hold a specific object (like your product)? Add a secondary image to your context in Enhancer.ai.
Example:
-
Upload an image of a red lantern.
-
Prompt: “A model standing in a foggy forest holding a small red lantern.”
This technique works with any prop: lanterns, Coke cans, phones—whatever fits your scene.
Step 4: Upscale Your Images
Once you’ve built your frames, upscale them for professional use using Enhancer’s Portrait Upscaler.
Choose:
-
Fast Mode for speed
-
Professional Mode for high-fidelity projects
🖼️ Before & After: The difference in quality is noticeable—especially with portraits.
Step 5: Animate & Add Sound
Take it one step further by turning your AI-generated frames into full videos.
Use:
-
Kling 2.0 for smooth camera motion (zoom, pan, handheld effects).
-
AudioX (free open-source tool) to generate:
-
Ambient sounds (wind, birds, rain)
-
Soundtracks for mood and drama
-
🎵 Just upload your visual, describe the vibe, and generate cinematic sound in seconds.
Final Thoughts
Creating cinematic stories from a single image is now easier than ever. With ImageN 4, Enhancer.ai, and ChatGPT, you can:
-
Maintain character consistency
-
Control visual flow frame by frame
-
Add props and environments
-
Build realistic mood boards
-
Turn AI frames into full video with sound
“Always remember—AI helps you create, but the vision is still yours.”