If you’re here after seeing my previous post or comments requesting this edit tutorial—welcome! In today’s post, I’m sharing a complete guide to editing a dull photo into a stunning masterpiece, just like the one I shared earlier. This is a short but extremely important tutorial, so don’t skip a single step if you really want to master this type of photo editing.
Let’s get started!
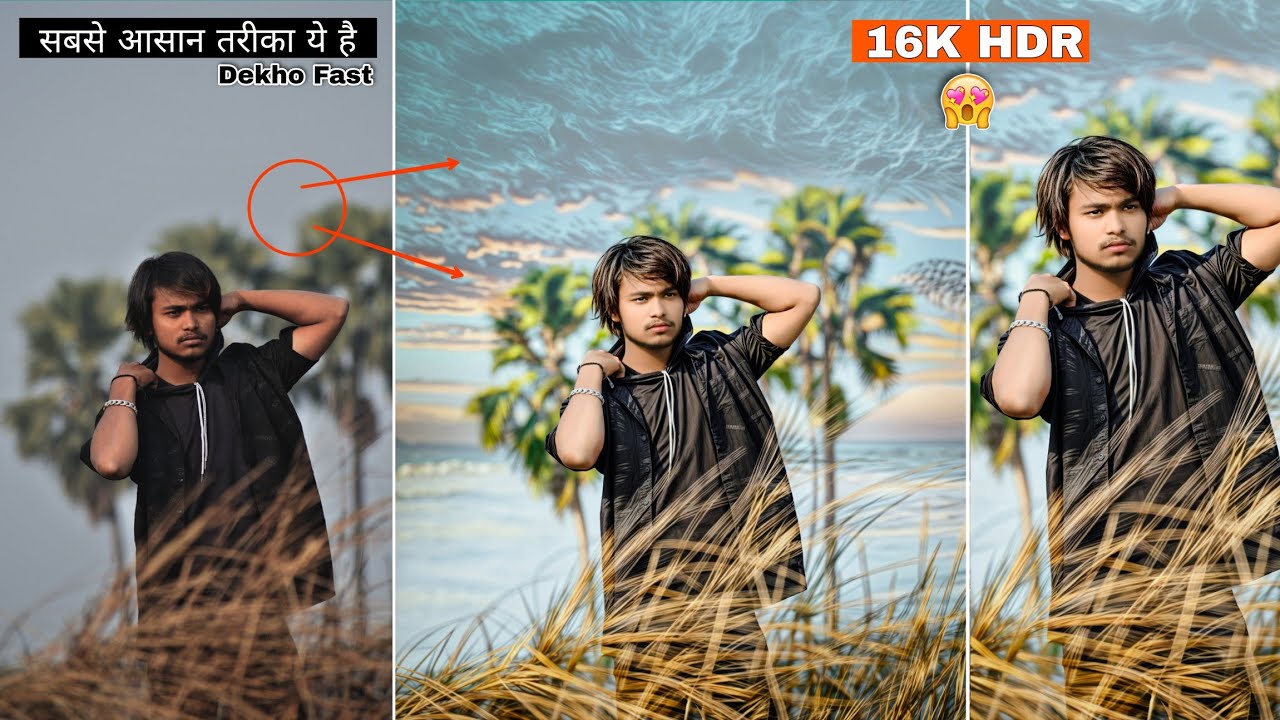
🖼️ Original vs Edited
First, let’s look at the before and after:
-
Original Photo: Boring and lifeless.
-
Edited Photo: Eye-catching and vibrant.
We’ll walk through every step to turn your image from bland to brilliant—exactly how I did it, without skipping anything.
🛠 Tools You’ll Need
Here are the apps and tools used in this tutorial:
📲 Step-by-Step Editing Guide
1. Resize the Image (PicsArt)
-
Open the image in PicsArt.
-
Click on Resize.
-
Set dimensions to 5000 MP and confirm.
-
This ensures high-quality output when adding PNGs or stickers.
2. Enhance Lips Color (PicsArt Retouch Tool)
-
Go to Retouch > Hair Color.
-
Select Red and manually apply it to lips.
-
Adjust Saturation to ~20 and confirm.
3. Add a Realistic Sky (PicsArt Sticker Tool)
-
Go to Stickers, search for Sky.
-
Choose a dramatic sky sticker and place it behind the subject.
-
Use Eraser Tool to fine-tune visibility and blend with the background.
-
Reduce Opacity to ~30% for natural effect.
4. Smooth Face (Autodesk SketchBook)
-
Open the resized image in SketchBook.
-
Use a Soft Brush (Size: ~41, Flow: 4, Strength: 20).
-
Gently smooth the skin and areas like hands.
-
This step boosts detail quality and prepares the photo for AI enhancement.
5. Enhance Image with Krea AI
-
Visit Krea AI and log in.
-
Upload the smoothed image (preferably a high-resolution one).
-
Use the 16x Enhance feature.
-
Let the AI generate an ultra-HD version of your image.
-
Download the enhanced version.
❗ Note: Krea AI doesn’t accept low-quality images. Make sure to export from SketchBook before uploading.
6. Fix the AI-Distorted Face (Back to PicsArt)
-
Reopen the enhanced photo in PicsArt.
-
Resize it again (e.g., 3092 MP).
-
Add the previously smoothed image on top.
-
Use Invert Eraser Tool to reveal the original face and blend it seamlessly with the AI-enhanced background.
7. Final Touches in Adobe Lightroom
-
Open the image in Lightroom.
-
Boost Green and Yellow tones for foliage.
-
Decrease Saturation on skin tones to balance color.
-
Use Color Grading to add a slight Purple and Sky Blue tone.
-
Adjust Contrast, Blacks, and optionally add Vignette.
-
Export your final edit!
📸 Final Result
You now have a high-resolution, magazine-worthy image ready to be shared. Whether you’re uploading to Instagram, using it in portfolios, or experimenting with AI tools, this method ensures the best possible outcome.
💡 Pro Tips
-
Use Remini if you still feel your image lacks clarity.
-
Always smooth before enhancing with AI.
-
Stick to the exact dimensions and tools mentioned for the best results.
Thanks for reading, and happy editing!